Inserting an image into an Excel file is very easy and straightforward as you would do so in any Word or PowerPoint file. The challenging bit is…to insert an image in a specific cell. This also means that you intend to ‘lock’ an image in a particular cell so that the image will stay put in that cell only. You don’t really need macro to help you with this. You just need a little trick to do the job!
But first, let me tell you why I need to insert images into specific cells. Part of my work involves documenting system defects that does not involve using bug-tracking software. When describing a defect, I want the team to have a clearer understanding of the problem. As the saying goes, a picture is worth a thousand words! So, for each logged defect (one defect per row), I have inserted the corresponding image (usually, screenshot of the system error) by…inserting a COMMENT! Yes, the trick to inserting an image in a cell, is through comment. Here’s how:
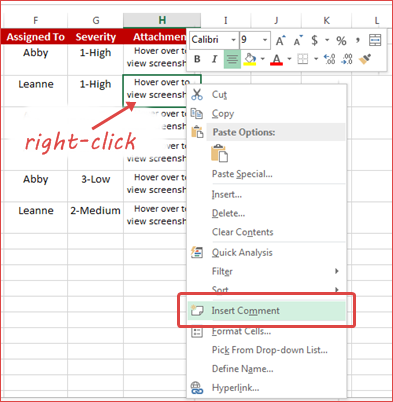
1. Right-click a cell that you want to insert the image, and select Insert Comment from the pop-up menu.
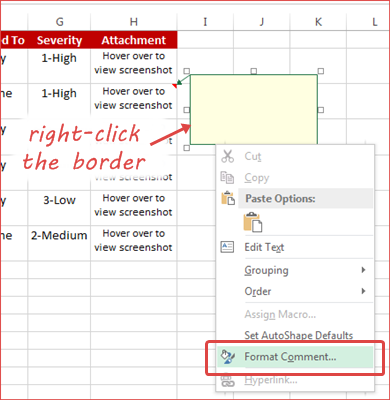
2. When the comment box appears, delete the default text in the comment box (if any). Then, carefully select the comment box by right-clicking its border and select Format Comment from the pop-up menu.
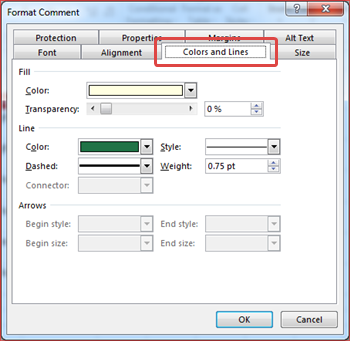
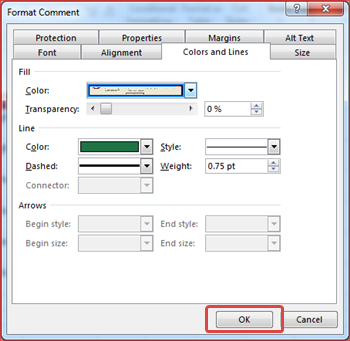
3. In the Format Comment dialog box, click the Colors and Lines tab.
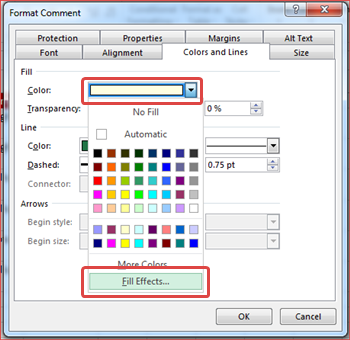
4. Under the Fill section, click Color and select Fill Effects.
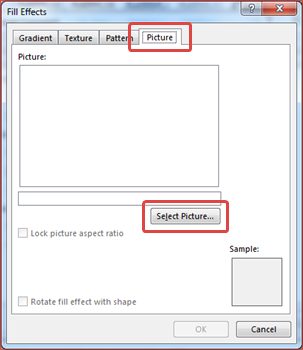
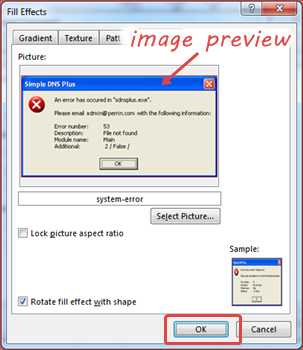
5. In the Fill Effects dialog box, click the Picture tab. Then, click Select Picture and look for the image that you want.
6. A preview of the selected image appears. Click OK.
7. In the Format Comment dialog box, click OK again.
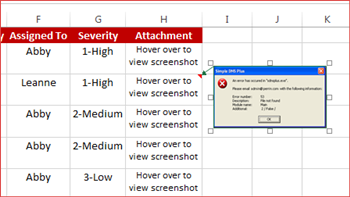
8. You have successfully inserted the image into the cell! All you (or another user) have to do, is to hover over the cell and view the image.
If you need to resize the image, right-click the cell and select Edit Comment. When the comment box appears, click the sizing handles and drag to resize to the length that you want.

However, if you find it difficult to fit in the entire image in a cell, you may want to consider resizing the original image file instead. For example, if the original size of the image is 1000px x 700px (which is obviously waaaaaaay too big!), you need to resize it first, using any of your image editing tool, before you insert the image in a cell.
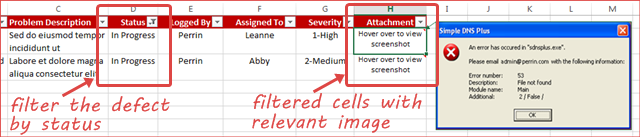
Now, let’s say, you have inserted all images into the cells according to the defects logged and there are 50 rows of defects in total. When you filter the defect status by “In Progress”, and hover over each filtered cell, you get to view its relevant image. This gives the impression of ‘locking’ the image in a cell because the image stays put in the cell that you have filtered.
Nifty trick, eh? Hope you find this useful in your line of work! If you like this trick, check out other tricks I have on how to use the Find and Replace function to remove leading space from multiple rows, and add a new word in between two words.